Blue Ox - EARTHEN OVEN
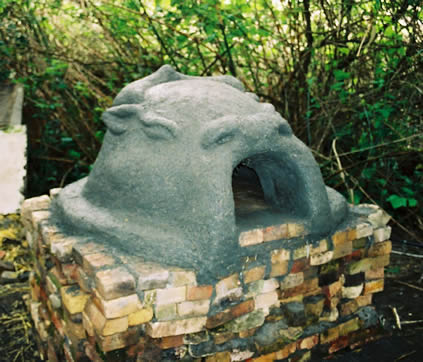
Our Earthen Ox at Blue Ox Alternative High School in Eureka,CA
Earthen Ovens have been used for thousands of years by cultures all over the world and they are still built today by people all over. Earthen ovens are made up of just that, EARTH! Sand, clay and generally straw are used to build these ovens. These ovens are quite versatile. An earthen oven can be used to cook anything you would in a normal oven (as long as you can fit it through the door!) But this type of oven is somewhat unique in that it doesn't have a fire continuously burning in it to cook with. It gets heated before any cooking is going to take place. Generally, they are fired for a few hours and the hot coals are then scraped out of the interior. Once the coals are scraped out, the oven is ready to cook in.
This type of oven works so well due to the characteristics of the materials and design. Earthen ovens are generally made up of three different layers. Each layer has a specific purpose. The first layer, which is the inner wall of the cooking area, is known as the dense layer, this is perhaps the most important layer to the oven. This layer is the "thermal mass", meaning it absorbs the heat of the fire and slowly radiates it. This radiated heat is what cooks the food in the oven. The dense layer is made up mostly of sand with some clay added. The second layer of the oven aids the dense layer by keeping the heat from the fire within the oven instead of letting it radiate outwards. This second layer is known as the insulative layer. It is composed of straw, with some clay slip added. The third layer is another earthen layer that is made up of sand and clay, but this one has straw added to provide the structure with tensile strength and overall stability. The outer layer provides strength to the oven and can be used to make the oven more aesthetically pleasing, by using it as a sculpting medium.
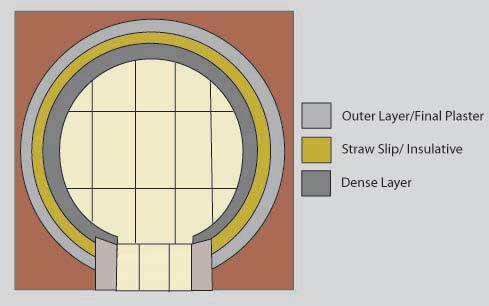
This figure shows the different layers of the oven walls, as if you were looking at the top cut off.
Earthen ovens can be built by anybody and can be done quite inexpensively, depending on the resources that you have available. Our oven was built for only $40, but we had clay, straw, and bricks at our disposal. A more realistic figure for cost would be around $200, depending what your foundation is made up of. Ours was made up of old bricks that were on site, but basically anything stackable and solid would work(broken chunks of concrete, often called urbanite, works well) That price figure will change depending on the size of your planned oven and the price of materials in your geographic location. The cost of the oven also depends on how much time you are willing to spend building it. As with the cost, the time invested is dependent upon the size of your oven. A good way to have more fun and spend less time in actually building is to invite all your friends over or have a class help out.

Building with earth doesn't take experts, or even adults. Building earthen ovens can be enjoyed by kids of all ages.
Who doesn't enjoy playing in the mud?
Foundation:
To build an earthen oven there needs to be a strong foundation underneath. The foundation for your oven basically serves two purposes. The first purpose the foundation serves is to raise the oven up to a working level. Do you want to be constantly hunched over to check on the items baking or to build a fire? The second purpose that the foundation serves is as a capillary break or, in other words, keep it from soaking water up from the ground. Water can be detrimental to earthen ovens and structures, so it is also a good idea to cover it. Our oven's foundation was made up of old brick pieces that were reclaimed from berry vines and stacked up in a perimeter wall fashion. This brick perimeter wall was infilled with a layer of pumice stone, then a layer of sand that was on site, and to top it off, a layer of sand that had no organic material (so it would not burn and make the baking surface shift and become less level). Once the final layer of sand was applied it was then smoothed out, so our firebrick oven floor would lay flat.

Here is our oven brick oven foundation with the firebrick layed.
Dense Layer:
Once the foundation is built and the firebricks are layed, you are ready for the first step of building the oven. If the oven is dome or igloo shaped, how do you keep the void for cooking in? Well, that is taken care of by a pile of sand. What you do is use moist sand to build a mound that will be the desired height of your oven (kind of like building a sand castle). The height of your oven is dependent upon the diameter. You want the oven no higher than 2/3 the diameter. Our oven was 27 inches in diameter and we were shooting for a height of 14-18 inches. Our sand pile mold wound up being 16 and 1/4 inches tall. Once the sand mold is to the correct size, it is covered with a plastic bag (don't worry, it gets removed!)

Here is our finished sand mold, ready for the plastic bag to cover it.
Now that the sand mold is finished and covered you are ready for the first layer, or the dense layer as it is also known. This layer is called the dense layer for a reason, a good portion of it is made up of sand. For our dense layer we used a 2:1 sand/clay ratio. The makeup of this layer is important because it is the sand in this layer that acts as the thermal mass. For building with earth it is important that ocean beach sand not be used, because the shape of the beach sand tends to be more rounded. When round grains are used the clay doesn't hold them together as well. A better type of sand would be river, plaster, or masonry sand which has less rounded grains.
To mix this layer we used 5-gallon buckets for measuring. We found that 1 bucket of sand worked pretty well with a 1/2 bucket of clay. A good rule when mixing your dense layer is that you want it to feel gritty and kind of "crunchy" sounding when squeezed in your hand. A good way to test your dense layer is to ball it up in your hand, toss it about a foot in the air, and let it fall back to your hand. If it crumbles apart, it has too much sand, add a little clay. If it deforms and flattens out, it needs more sand. The ideal consistency would be for it to hold its ball shape well and not crumble apart. To apply this layer all you need to do is to begin adding the material around the perimeter of your sand mold and work your way up. A good width for this layer is about hand-width, which means roughly about 3-4 inches.
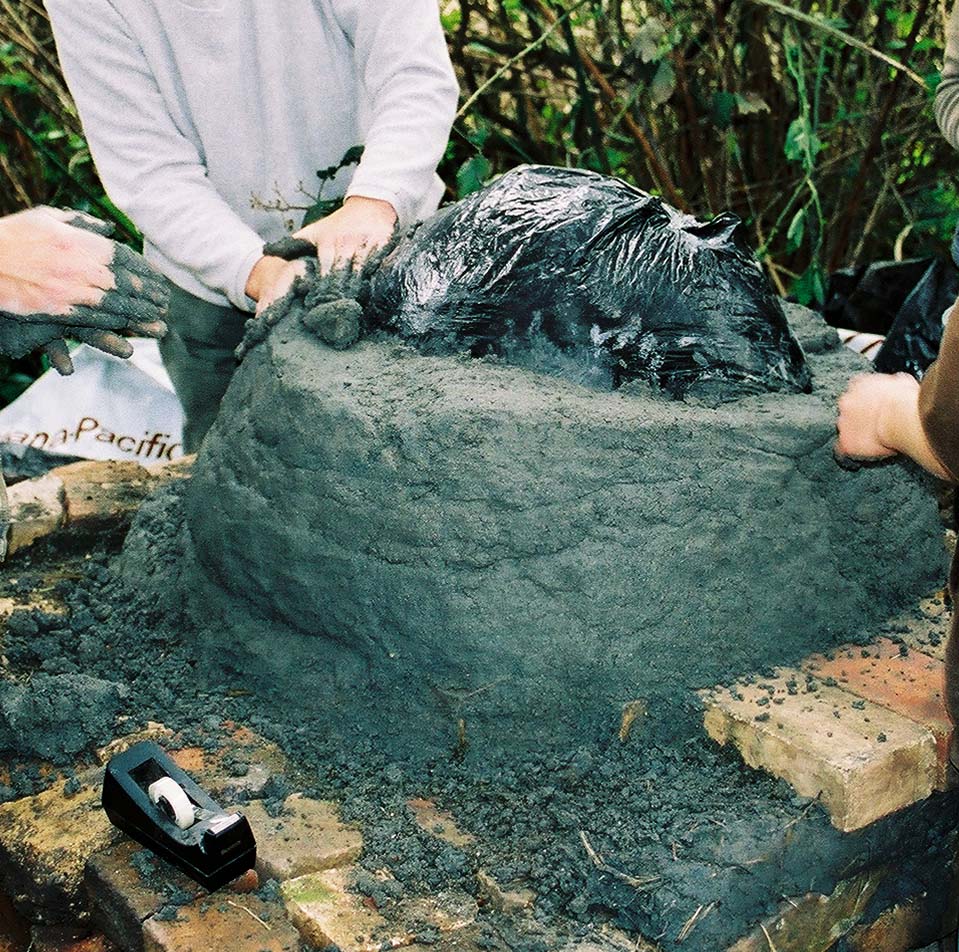
Applying the dense layer.
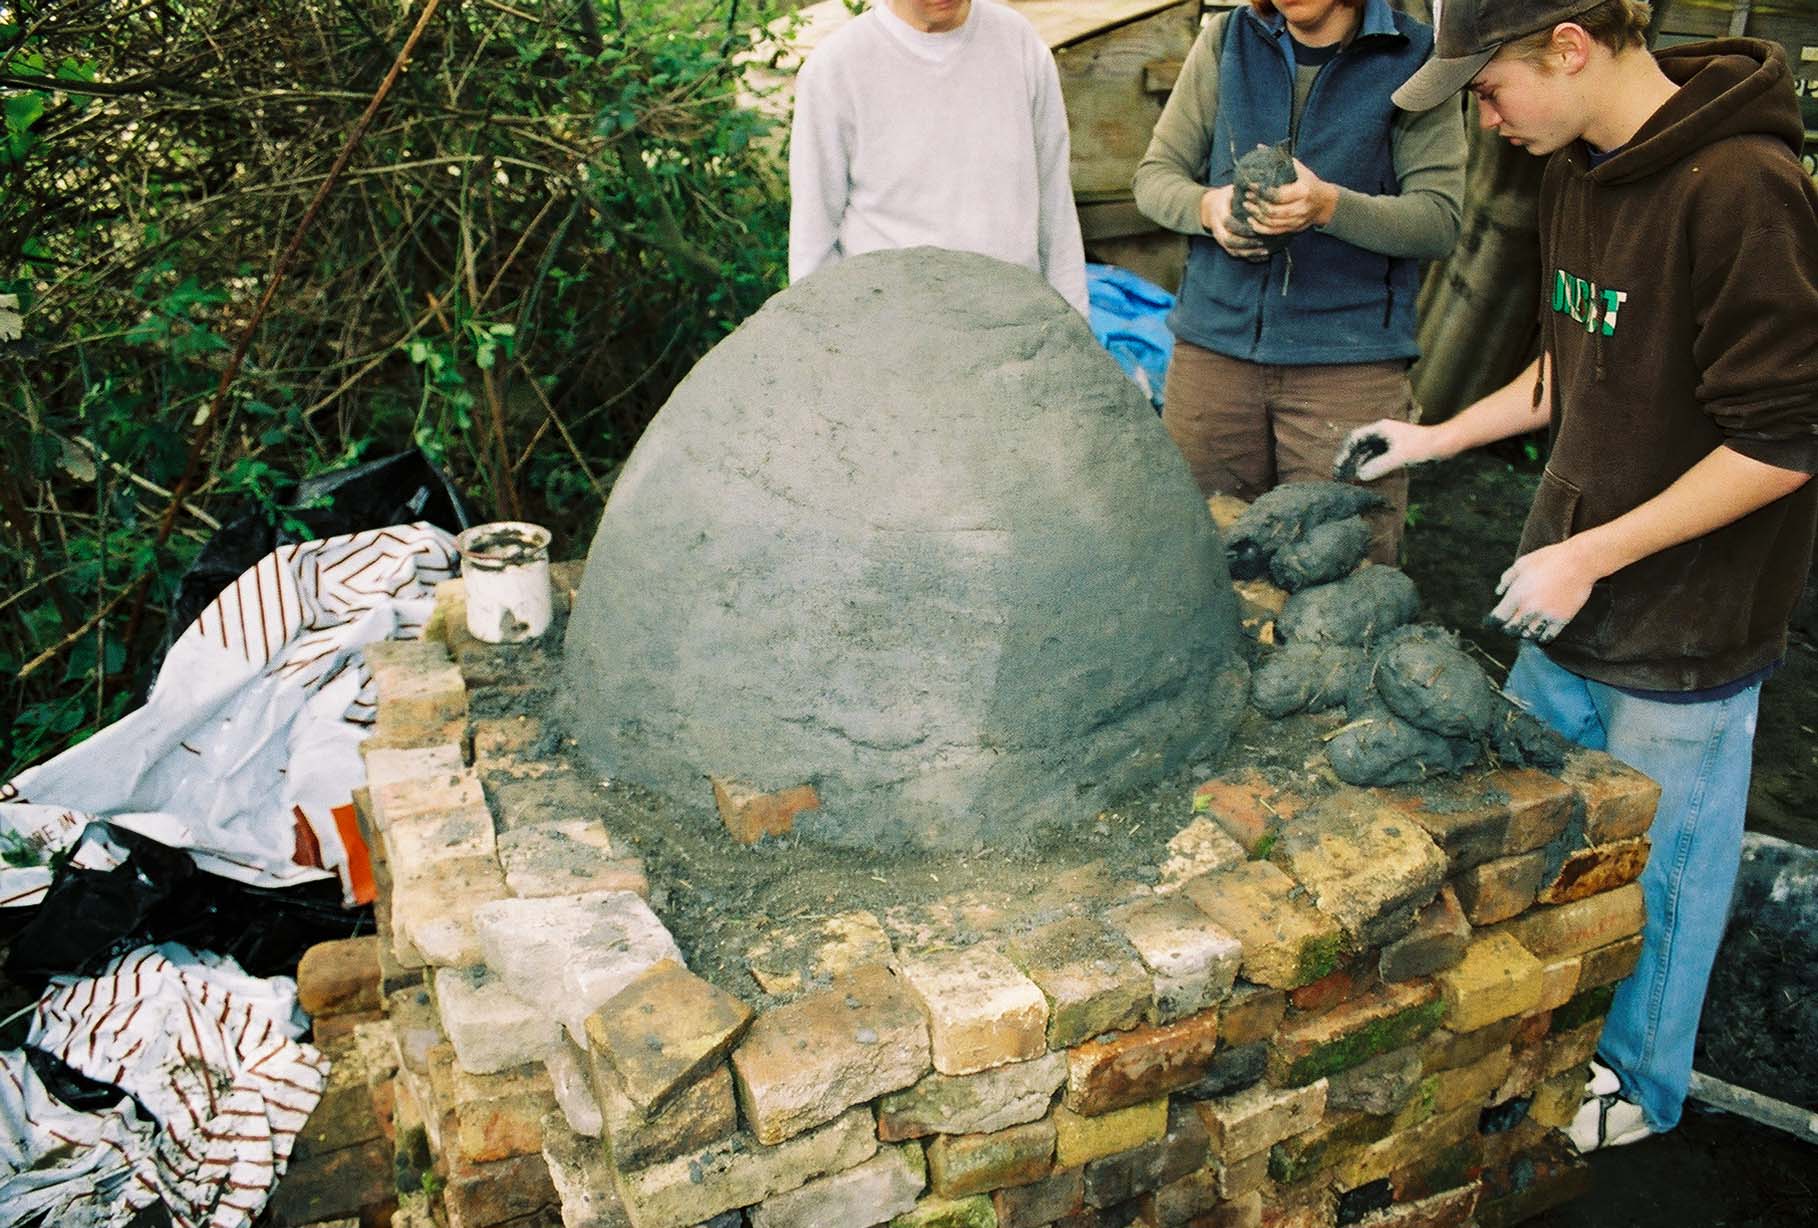
Here is the dense layer completed.
Making the Doorway:
After the dense layer is completed, the next thing to do is to cut the door out of the dense layer material. This is an important step because the height of the door is important to the thermal characteristics of the oven. The door height should be close to 63% of the interior height of the oven. For example, our oven's interior height was 16 and 1/4 inches, so our door height was roughly 10 and 1/4 inches tall. The door should be cut while the layer is still soft, it can be cut with any type of knife-like object that is fairly strong. Once the door is cut, the sand mold gets pulled out.
Cutting the door
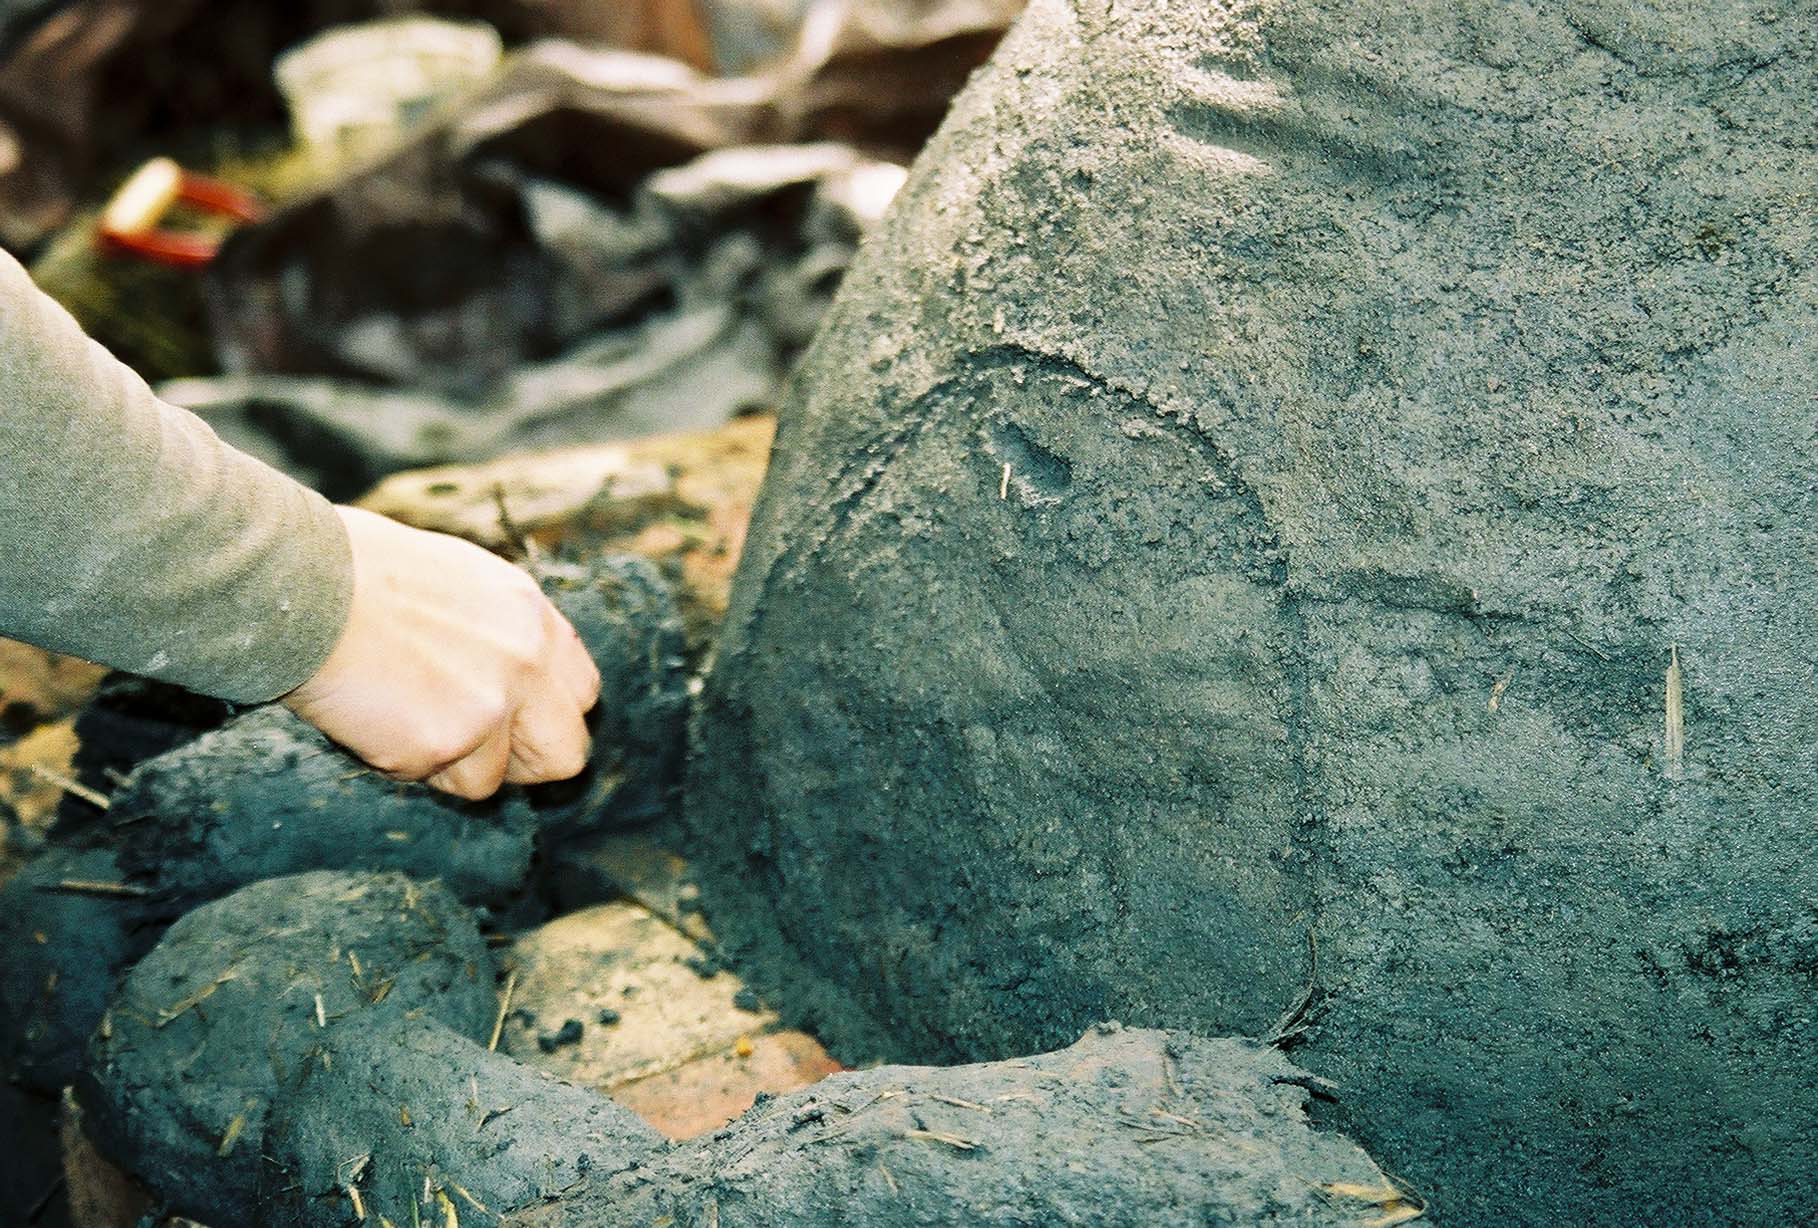
After the door is cut, there needs to be a cob section formed at the front of the oven. Our mix was made up of a 1:1:1 sand/clay/straw ratio. This material can be seen in the above photo sitting on the bricks. It should have more clay to sand than the dense layer. The basic technique to do this is similar to corbelling, which is a technique that is used to form arches out of cob material in building. Semi-rectangular loaves are made and stacked on each side of the door, with each one just a little to the inside of the other. They are stacked in this fashion until they meet in the middle, at the apex of the door.
Insulative Layer:
Once the doorway is finished, the next step is to add the straw-slip insulative layer. This layer is made by taking some straw, one flake at a time, and adding clay slip. To make the slip; add water to clay, mix until there are no chunks and the slip webs up and breaks between your fingers when you dunk them and split them apart. The prepared slip is then fluffed into the straw. The way to tell when your straw-slip layer is ready to be applied is when a handful can be compacted and it holds together well when taken by a pinch in the middle and lightly shaken without falling apart.

The prepared straw-slip layer waiting to be applied.
This is the oven with the insulative layer applied. It is dry in this photo because we applied it and then decide to use that a a stopping point. We added more clay slip to the insulative layer before applying the next layer.
Outer Layer:
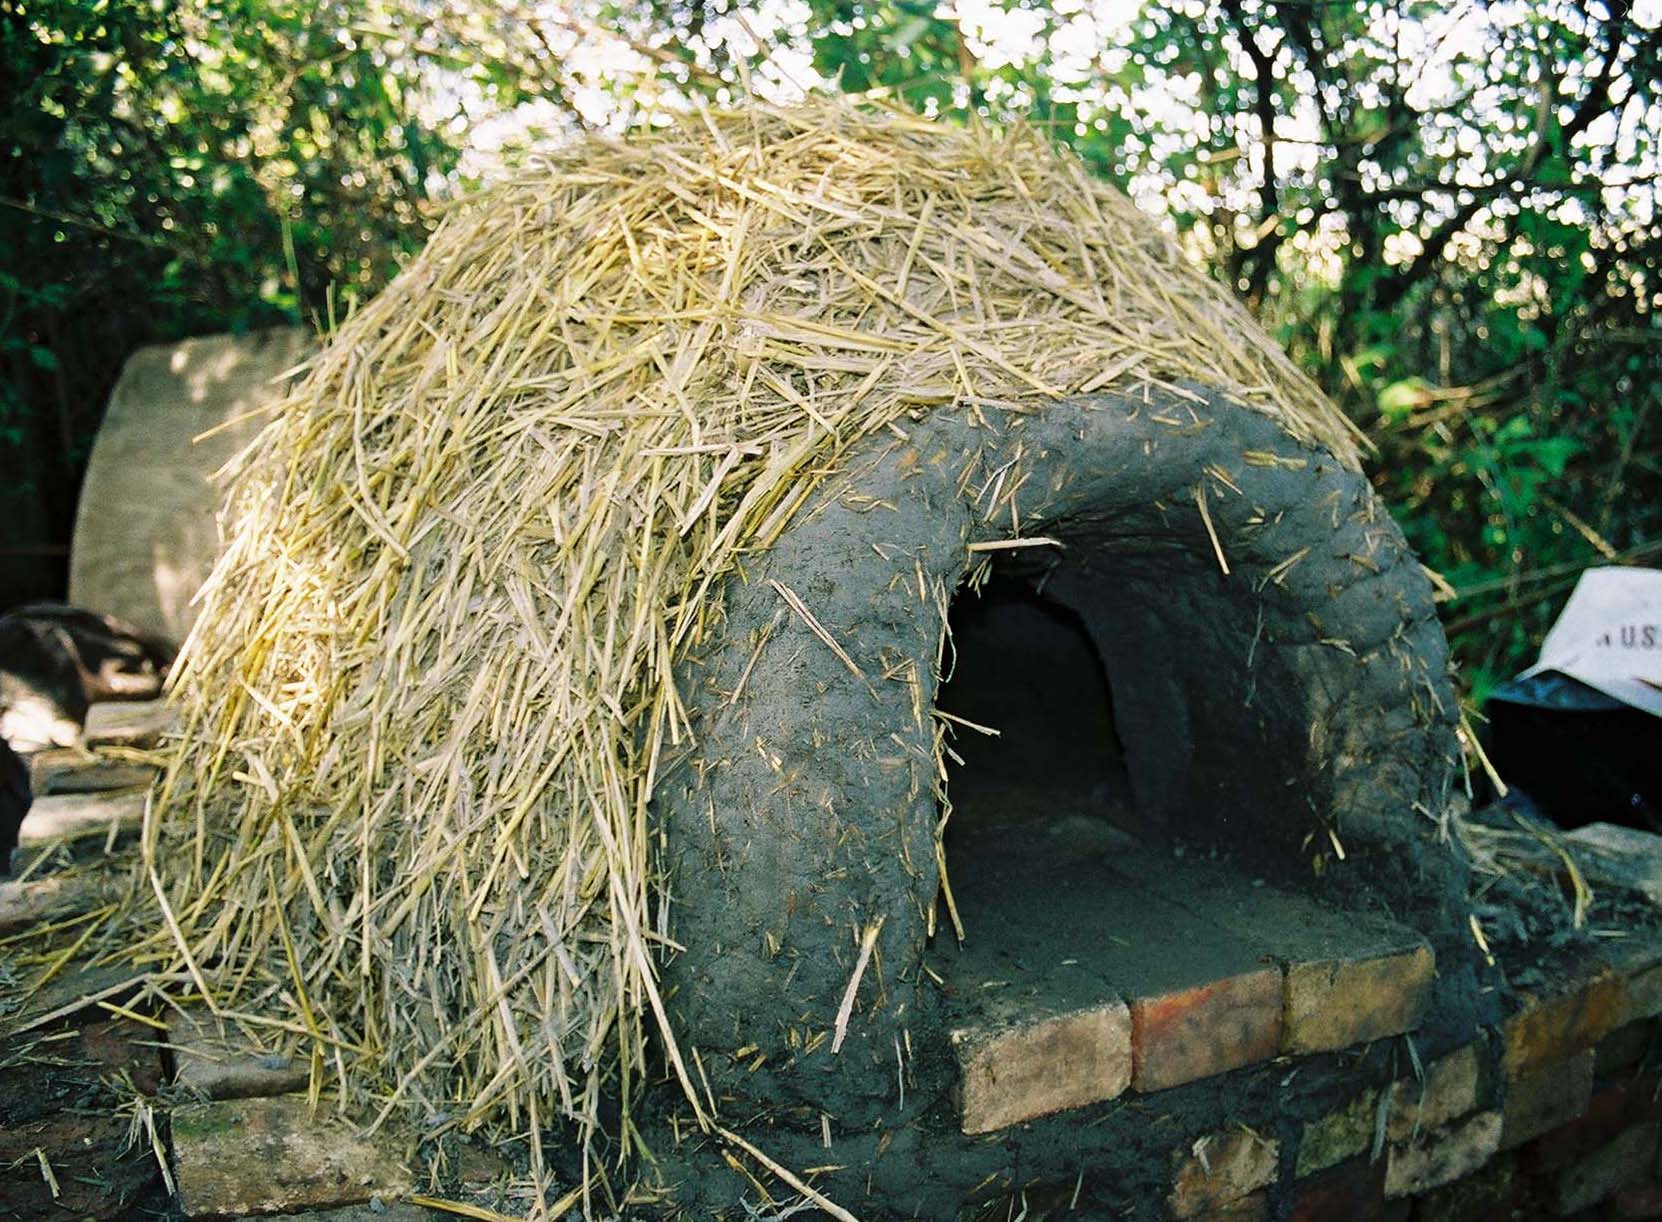
With the insulative layer finished, the next step is to begin the outer layers, which are made up of clay, straw, and sand. Our mix for this layer was made up of a 1:1:1 clay/sand/straw ratio. For the initial covering of the insulative layer, the straw in this layer needs to be chopped into pieces that are no more than 3 inches long. This is done to make it smooth over the straw-slip/insulative layer better. This first outer layer is applied by kind of pushing it onto the straw-slip layer. Once this initial covering of the straw-slip layer is complete, it is time to do any sculpting or artistic contours that you would like to add.

Covering the insulative layer with the first of the outer layers.

Rough sculpting begins after the first of the final layers is applied. Our ox begins to take shape!
Final Plaster:
The preparation for the final plaster material is fairly labor intensive, because you need finer materials to work with. The straw for this layer must be in fine pieces, no more than 1/2 inch long. To get the straw to the correct consistency we chopped it and grated it over a screen. We also had to sift the sand to isolate smaller grain sizes for a more fine finish. For our final plaster layer, as an experiment, we decided to add redwood sawdust that had been soaked in water and lime. This was done to try to lighten the weight of the final plaster coat. The lime was added as a preservative to ward off rotting problems with the organic material. The ratio for the plaster mix really depends upon your materials. For our oven we tested four different mixes. We tested 1:2:1, 1:2:2 clay/sand/straw mixes and 1:2:1:1, 1:1:1:1 clay/sand/straw/hydrated lime sawdust mixes. For our oven, we decided on the 1:2:1:1 mix. To test your materials simply make up a few different mixes and lay them out flat on a piece of plywood or what ever flat surface is available that will not get rained on. For your final layer use the mix that cracks the least and seems most sturdy. To apply the plaster mix, just smooth it on over the last layer you put on. The plaster layer should only be no more than 1/2 inch thick. Once applied, it can be run over with a wooden board to smooth it out.

Testing our mixes. The mix we used is at the bottom left.
Our earthen ox oven completed!
Drying the oven:
Once finished with the oven, it is drying time for the oven. Drying of the oven can also be quickened by starting small fires inside the oven to provide warmth and facilitate evaporation of moisture. It is a good idea to use several of these small fires over a couple of days in the oven to help dry it out, especially if you live in a moist climate. After these small drying fires, it is time to begin cooking. With the oven itself completed, a door will need to be constructed to help keep the heat in while baking. The door is basically just a wooden plug that is fit to slide into the doorway of the oven. It can be covered with foil to keep it from burning, but some people find that when cooking it helps to drape a wet cloth over the door, to let more moisture into the baking chamber.
Cooking:
Cooking in earthen ovens generally takes some experimentation to get right, since each one is unique. Once the experimention begins, you will begin to find out about your oven's personality and begin to find out nuances of how to cook in your oven. Once you learn your oven's personality you can become a master baker in your backyard.To get the oven hot, a large fire is built inside it and burnt down to coals. The time to heat up your oven is dependent upon the size of your oven. A handy tool to have when firing your oven is an oven thermometer, it will give you a ballpark idea of how hot your oven is. Our oven took three hours to heat up to 500 degrees, then within an hour dropped down to the 425-375 degree range, where it then held a steady temperature of 350 degrees for approximately three hours, and it was still over 200 degrees the next day! To get the most out of the fire you should try to cook as many things as possible that utilize the entire heat range of your oven from the highest to the lowest temperatures. This is done by cooking things that need a high temperature first while the oven is still hot, and then as the temperature falls you can cook items that need less heat.

Heating up the oven.

Solomon with a fresh loaf of bread.
see the step-by-step building of our oven
Thanks to:
Kirsten Thompson
Blue Ox High School Students and Staff
Lonny Grafman
Solomon, the bread maker
Engineering 305 and 114 students