Our oven floor was planned to be 27" in diameter. The floor would be round as it is the base of the dome shaped first layer.
The floor is made up of 23 fire bricks obtained from our local masonry shop: six bricks wide, four bricks long, with a five brick lip on a side of the long edge that would face away from the retaining wall.
The bricks serve as the cooking surface inside the oven. They use conduction to directly heat the food. Each brick measures approximately 4.5" wide by 9.125" long by 3" deep. Even though these bricks are factory made, there are still minor imperfections on their surfaces which cause them to not fit together perfectly. It is important to create a level oven floor without bumps, gaps, or uneven spaces. This is because food will constantly be scraped up from the floor onto cooking utensils and other cooking implements. Less gaps between bricks also means less ash that can fill those gaps, and therefore more concentrated heating power remains in the bricks. Also, it just looks nice.
 We brought the bricks to the project site and assigned an elite
EWP to oversee the most perfect assembly of the
floor. The team of five used guess and
check methods to configure a mostly level floor on the patio. Once the floor
was installed on the fine bed of sand on the foundation, it was almost perfectly
level.
We brought the bricks to the project site and assigned an elite
EWP to oversee the most perfect assembly of the
floor. The team of five used guess and
check methods to configure a mostly level floor on the patio. Once the floor
was installed on the fine bed of sand on the foundation, it was almost perfectly
level.
Assembling the floor was a tedious process. It required a lot of patience as there were so many different combinations, most of which didn't seem to work. Despite all the difficulties the team prevailed and had figured it out in about an hour and a half. (Way to go team!) It was extremely helpful to have a team dedicated to the task, especially one that was willing to dive right in. The team even figured out that they could shade the corners of some bricks with chalk or draw arrows on them to indicate if they needed to be raised or lowered in the sand bed.
After the floor was laid out on the patio, the bricks were numbered from the center out. Then we used a string to draw a circle with a 13½" radius (half our 27" floor). This is where the sand form (in the next step) would go. We had to make sure the circle we drew would allow enough room between the retaining wall and the future layers of the oven. Since the main body of our oven floor was rectangular, we had some room to play with. The center of our circle was about 15" in from the back of the brick layout. The retaining wall was about 9" away from the back of the bricks. This ended up being about a perfect distance since the oven walls would be about 10" thick, and start 10½" away from the wall. This would give us about a 1/2" gap between the oven and the wall.
 A numbering system, such as the one mentioned above, indicates the order in which the
bricks are to be laid in the sand bed. Laying the bricks from the center out
reduces the likelihood of the fine sand shifting all to one side, making the bed uneven.
If the bed becomes uneven or if too much sand is disturbed, the bricks must be
taken off and the bed must be leveled again.
A numbering system, such as the one mentioned above, indicates the order in which the
bricks are to be laid in the sand bed. Laying the bricks from the center out
reduces the likelihood of the fine sand shifting all to one side, making the bed uneven.
If the bed becomes uneven or if too much sand is disturbed, the bricks must be
taken off and the bed must be leveled again.
We drew a map of the numbered bricks while they were on the patio and used the map as a guide to set the bricks. Using Denzer's classic "kiss and slide" brick setting technique, the bricks were carefully set into place perfectly, on the first try.
Once all the bricks were in place, it was time to build the sand form.
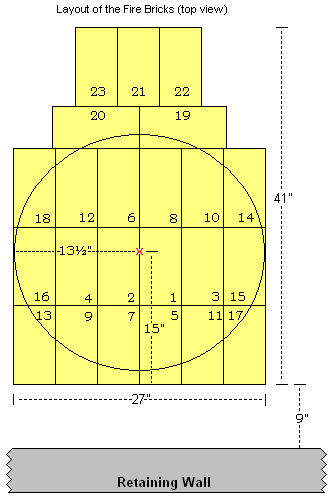
Floor Plan